I'm completely redoing our office/guest room, but before I do the full reveal, I felt this project deserved it's own post.
I really wanted a new ceiling light rather than the old generic one that was in there. The ones I wanted were too spendy for me, so I turned to google (of course) and discovered THIS light from The Painted Hive, one of my favorite blogs!
Using her idea, I did some shopping around and found a ceiling mount fixture that would work. I already had a basket I'd bought for an earlier organization project.
This was such a fun task and was WAY easier than I'd anticipated.
I do believe it's my favorite part of the whole room!
I do believe it's my favorite part of the whole room!
We'll start with the after pic, followed by a tutorial!

My basket isn't round like The Painted Hive's, but the square shape works well with the modern lines in the room.
To make this light, all I needed was:
(really any cage style basket will work, round or square, of any non-flammable material)
Ceiling Light kit
Ceiling Light kit
Nickel Metallic Spray Paint
Wire Cutters

I wasn't sure how the whole thing would connect, so I was delighted to have all the work made easy by this handy-dandy o-ring.

Cover the wires with painters tape and then spray away

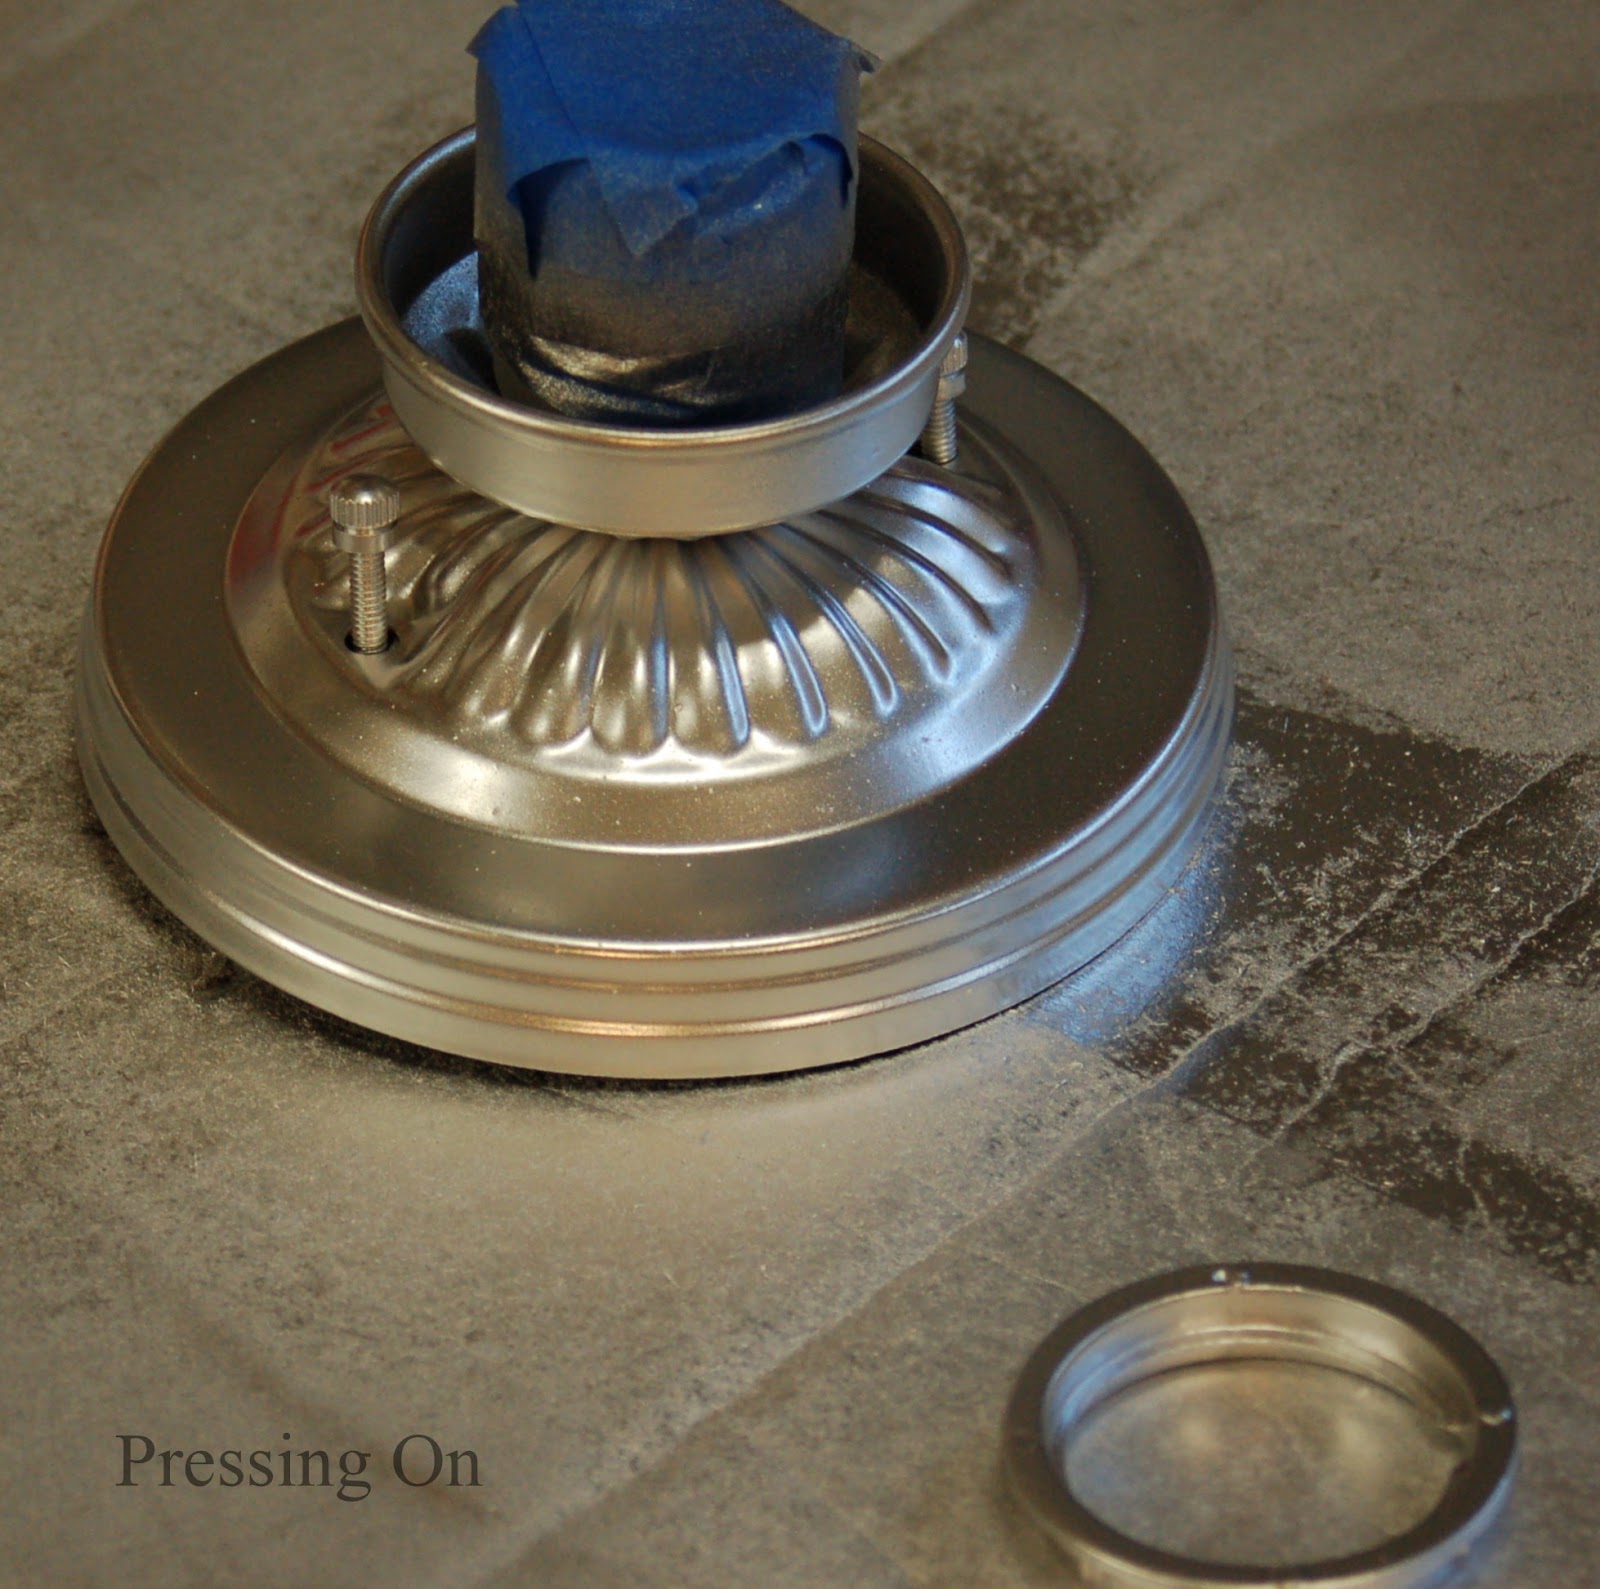
Take the o-ring and place it where you want to cut the opening in the basket (mine needed to be smaller than the o-ring and larger than the bulb holder). Mark with permanent marker and cut away (make sure it's not too wide, since you can't make it small again)


Oh, you also need some
mad wiring skillz...just kidding, kind of . I taught myself to wire lights
through YouTube. It's not rocket science, but knowing how to do it makes you feel like
you can do anything!
Wire light, then install! I used this fancy vintage Edison bulb.
It was more expensive than any other part of the light project and though it looks cool, it casts way too yellow of a light for my preference. I'll probably use a clear bulb next time I need to buy one.

BEFORE:

AFTER:

All lit up!

I adore how it came out and I hope you do too. Stay tuned for the full room reveal later this week.


Linking to:

Twice Owned Tuesday @ House of Grace
Uncommonly Yours @ Uncommon Designs Online
Share It @ The Winthrop Chronicles
Party @ Organize and Decorate Everything
Show Me What You Got @ Our Delightful Home


Uncommonly Yours @ Uncommon Designs Online
Share It @ The Winthrop Chronicles
Party @ Organize and Decorate Everything
Show Me What You Got @ Our Delightful Home
What's It Wednesday at Ivy and Elephants
Show and Share @ Vintage Gwen
Winter Blues Wednesday @ DIY by Design
Wow Us Wednesdays @ Savvy Southern Style
Whatever Goes Wednesday @ Someday Crafts
WhateverWednesdays @ Momma Hens Coop
Show and Share @ Vintage Gwen
Winter Blues Wednesday @ DIY by Design
Wow Us Wednesdays @ Savvy Southern Style
Whatever Goes Wednesday @ Someday Crafts
WhateverWednesdays @ Momma Hens Coop


http://makingtheworldcuter.com/2012/07/making-the-world-cuter/


This looks wonderful, Miranda! So much more character than a stock light from a store!
ReplyDeleteThanks for sharing it at Knick of Time Tuesday!
P.S. - I'm a homeschool mom also! I'm at the tail end of my journey though - 2 of mine have graduated, 1 will be a senior this year and 1 in 7th grade. Enjoy those younger ages - so much fun!
Blessings,
Angie @ Knick of Time
Love the light Miranda. Very unique and creative. Now that's a light you will notice. Hopped over from Knick of Time. Now a new follower.
ReplyDeleteHugs,
Jann
What a fantastic transformation. I love this idea and I thank you for the great tutorial. I'm sure it casts some really cool shadows.
ReplyDeleteThe light fixture looks so unique! You did a great job.
ReplyDeleteVery Cute!
ReplyDelete(found you on Knick of Time and am a new follower!)
Ashleigh @ Rustic Anthology.blogspot.com
Fun...love it :) Laurel
ReplyDeleteIt looks adorable! I had picked up a similar basket a while back hoping to do a similar fixture. You have inspired me to get moving. :)
ReplyDeleteSo cute! I love it!
ReplyDeleteWhat a darling idea! I also love that you used items that you can purchase at a store. Sometimes it's hard to find just the right thing at the thrift store. You made it totally do-able for everyone! Love the final result!
ReplyDeleteThanks for the inspiration!
Have a happy day!
Tausha
sassystyleredesign.com
Veeerrry Cool! Love it :)
ReplyDeleteThanks so much for linking up at I Gotta Create!
<3 Christina
OOO I like how it looks when turned on! Very cool and unique. Great pictures showing how you did it too! Please come share this at our link party - "Home is Where the Heart is" http://www.homesteadsimple.com/home-is-where-the-heart-is-link-it-up-wednesdays-2/ Please feel free to link any other posts you'd like to share!
ReplyDeleteLove how a simple change creates such a drastic difference! It's fabulous! I'm doing this in my boys toy room but with a longer basket! Found you at The Shabby Creek Cottage :]
ReplyDeleteWow, electric scares me! This looks fabulous!
ReplyDeleteVery cute! I made one myself using a basket.
ReplyDeleteI love it. I have on old, metal, mesh garbage can that I'm thinking of using as a pendant. Making creative lighting fixtures is super fun! Great job.
ReplyDeleteWhat a super fun project! I am going to have to file this one away for when I can change light fixtures :-)
ReplyDeleteWhat a charming idea!!! Thanks for sharing at Feathered Nest Friday!
ReplyDeleteThis is Melissa @ Daisy Mae Belle. LOVE this light! And, it is so easy to do! I am surprised!
ReplyDeleteI love this! I have a wire basket just like that - might have to repurpose it into a light fixture if I can just find the perfect stop to put it! Great job on learning to wire it in yourself too!
ReplyDeleteVery. Cool.
ReplyDeleteWhat a great industrial look, thanks for sharing!
ReplyDeleteWow...Love how this turned out! I'm a sucker for anything industrial and metal baskets too so this is perfect for me. Found you via the blog hop at Knick of Time and am a new follower!
ReplyDeleteThis is sooo adorable! I have been wanting to do this too, and after seeing your courage, I am going to do it.....
ReplyDeleteWish me luck!
Very cute! It really looks like a vintage wire piece--love it!
ReplyDeleteI really do love it, and love the vintageness it provides in the room. Really very cute, I thinking of making a few for my home! Thanks for sharing your creative inspiration with Sunday's Best - you help to make it a great par.tay!
ReplyDeleteI think I like your square one better!
ReplyDeleteLove how simple this is for such a big impact! Found you through My 1929 Charmer's party! :)
ReplyDeleteVery, very cute! ;) And I love those Edison bulbs! I just used one in a recent light ADDITION! ;) http://www.queenofthecreek.com/2012/07/hows-it-hanging.html I really love the basket idea! ;)
ReplyDeleteThis is so great and I loved all of the products you used to make it. All from a hardware store, I am assuming. I hope you will come on by and link this up starting Wednesday night to The CSI Project. It is the hardware store challenge. We have tutorials daily and then the competition starts. Come on by this week and every week for a new challenge.
ReplyDeletewww.thecsiproject.com
How clever and thrifty! And it's super cute!
ReplyDeleteI love this light. I wish I had some place a light like this would work in our house. Thanks so much for sharing on Tout It Tuesday! Hope to see you tomorrow.
ReplyDeleteOh oh oh I really love this. I have an obsession with ridding my house of boob lights and replacing them with fun/free/DIY items. Great inspiration.
ReplyDeleteSarah
This is fantastic - I love it. I don't think this is something that I could do (two left hands when it comes to tools!!) but I might show this to my husband who is really handy and creative with tools.
ReplyDeleteGreat job - I am linking up a project on a few of the blogs you have linked up on. Hopefully you'll come visit me as well and comment.
Linda
I am featuring you tonight at 6:30pm during Sticker and Party Time! Thank you for linking up to my party... I hope to see you there!
ReplyDeleteI am featuring you tonight at 6:30pm during Sticker and Party Time! Thank you for linking up to my party... I hope to see you there!
ReplyDeleteI LOVE this! such a cute idea. this would be perfecrt in my work room
ReplyDeletemarissa
rae gun ramblings
I love this idea! Thanks so much for the step-by-step tute! Featuring this today as part of Pretty Things Thursday.
ReplyDeleteJen
This is so cool!! And unique! Hmmm I wonder where I could put one of these in my house ;) I'd love for you to share this at my Throwback Thursday link party. http://www.hubbymademe.com/throwback-thursday-no-3/
ReplyDeleteHope to see you there and thanks so much for sharing!
This is awesome! I love how industrial it looks and if I wasn't moving in 2 months, I'd be all over this project!
ReplyDeleteFantastic! I love how it looks!
ReplyDeleteHopping by and following your lovely blog (FB and Pinterest).
ReplyDeleteThe Quiet Mom blogging @ Spaghetti with Meatballs Recipe
Also, don't miss our Custom Blog or Social Network Button Giveaway
Thanks so much for linking up to Make the Scene Monday at Alderberry Hill. I'm a little late with the features but you are being featured later today none the less!
ReplyDeleteI just like the helpful info you supply in your articles.
ReplyDeleteI will bookmark your blog and take a look at once more right
here frequently. I am somewhat sure I'll be informed many new stuff right right here! Best of luck for the next!
Also visit my blog post - click through the following internet site